
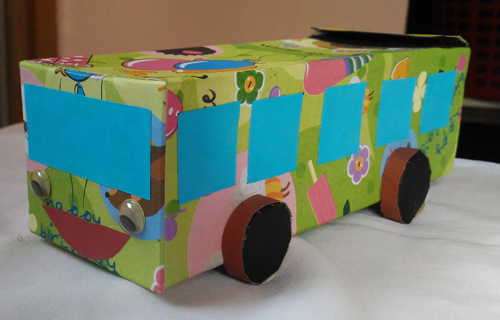
Bus Present Wrapping
There are kinds of present wrappings for kids which can make them excited by looking at it. Here, we’re going to give an idea of exciting present wrapping, not only by looking but by playing it as well. It is called bus present wrapping.
To create one, here are the list of materials and how to make it.
Materials:
- Used box (Adjust the size of the box with the present we give. Here’s a tip. This kind of wrapping is suitable for small size present or clothes as we can roll the clothes to fit in the box)
- Wrapping paper
- Colorful paper
- Used wrapping foam/ bottle lids
- Wiggly eyes
- Glue
- Velcro
How to make it:
- Wrap the outside of the box with the wrapping paper, except the box lid. Leave it open.


- Now, wrap the box lid. Make it still be able to be opened and closed.
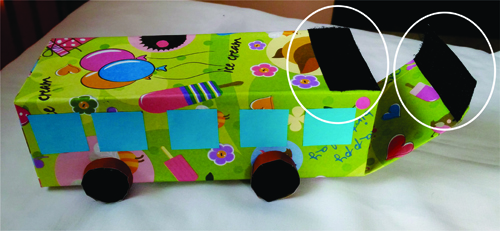
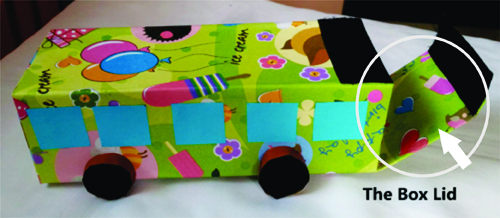 Paste Velcro on top back part of the box and the pair at the box lid.
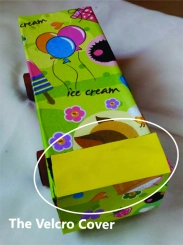
- Paste a piece of colorful paper on top of the Velcro at the box lid. The function is for covering the Velcro and as a decoration as well (optional).
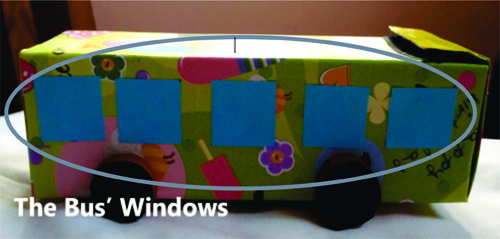
- Paste the bus’ windows made from colorful paper on the sides and the front of the box.
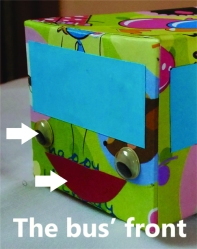
- Paste wiggly eyes at the front of the box and paste the mouth made from the colorful paper.
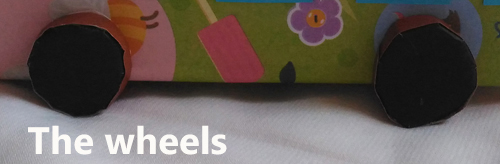
- Last, paste the wheels (they can be made from used wrapping foam or bottle lid which are wrapped with colorful paper) at the sides of the box.
Now the bus present wrapping is ready. Put the present inside the box.


When our kids want to bring out the present, just pull the Velcro. Later, they can close the Velcro and use the bus present wrapping as a toy.
Exercising Toddler to Control Body Movement through Running
Toddler usually loves running. When they are at this stage, it’s good if we give them the chance to do so a lot. However, we often see they bump onto things. When this happens, it’s actually normal because they haven’t been able to control their body movement and consider the situation around them. Though, it’s normal, we often worry that the bump will hurt them. And we don’t want this, do we?
To deal with this, there are actually ways to make toddler able to control their body movement and know when they have to stop, so they won’t bump onto things. Here are ways we can do:
- Take toddlers to run at the park
It’s something we normally do. It is so ordinary, yet it’s good to exercise toddlers’ ability in running. Park is a large space with less things which will block toddlers’ way. Here, they can run as free as they want. This will make them able to run steadily. When this happens, it actually means that their gross motor muscles have been exercised, improved and strengthened. And these are what they need in order to be able to control their body movement.
- Ask toddlers to run at the backyard
Backyard’s space is smaller than the park. When toddlers run here, they will actually feel the differences. They will still be able to run freely. However, they have to adjust their body movement. They have to control their body movement more as the narrower space of the backyard requires them do so. And this will make the control of their body movement exercised.
- Ask toddlers to stop running in front of person or things.
Let them do simple game which will exercise them to stop running before they bump onto things. To do the game, we need:
- Us (Toddler’s parents, siblings, grandparents or people we can trust).
- Colorful cones or inflatable balloons or other toys which toddlers like.


How to do the game is simple. Ask toddlers to start running from a point to another point where there is a person or thing at the finish line. Ask them to stop before they bump the person or the thing. Do it several times in fun way, so they would want to play. Put things they like at the finish line such as colorful cones, inflatables balloon of children’s favorite character, etc.


The game will make them able to aware of the things around them and to use the control of their body movement they already have. The result is they can stop themselves before they bump onto things.
There you go. Those are the ways we can do to exercise toddler to learn to control their body movement.
Heart Weaving
Heart Weaving

Do you have pile of used wrapping paper ? Let’s ask our children to use it to make heart weaving. In order to make it we need:
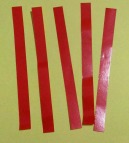
- Used card/ wrapping paper ( The size of the card in the picture is 5.7inch x 4.3 inch)
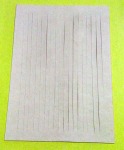
- Paper strips from used wrapping paper (The width size of the paper strips in the picture is 1cm)
- Glue
- Cutter
How to make it:
- Put the card in portrait. Spare 1 cm space from the top and the bottom of the card. Draw 18 vertical lines with the space length of each lines is 0.5 cm.
- Slice the lines with cutter.
- Slip the paper strip underneath the columns on the card and show :
- The first paper on the 9th column (whether from left or right of the card).
- The second paper on the 8th, 9th and 10th columns
- The third paper on the 7th until the 11th columns
- The fourth paper on the 6th until the 12th columns
- The fifth paper on the 5th until the 13th columns
- The sixth paper on the 4th until the 14th columns
- The seventh paper on the 3rd until the 8th columns, slip underneath the 9th column, and show it again on the 10th until the 15th
- The eighth paper on the 2nd until the 7th columns, slip underneath the 8th until 10th columns, and show it again on the 11th until the 16th
- The ninth paper on the 1st until the 6th columns, slip underneath the 7th until the 11th columns, and show it again on the 12th until the 17th
- The tenth paper on the 2nd until the 5th columns, slip underneath the 6th until the 12th columns, and show it again on the 13th until the 16th
- The last on the 3rd until the 4th columns, slip underneath the 5th until the 13th columns, and show it again on the 14th until the 15th
- Flip the card and glue the paper strips onto the card.
- The heart weaving is done.
The heart weaving can be use for many kinds of purpose such as:
- Greeting card: To make it as a card, just paste blank paper on to the back of the heart weaving. Use it to write the greetings
- Book cover decoration: Just paste the card onto a book cover.
- As a wall decoration: Just frame the card and hang it on to the wall.
The heart weaving is great for children age 5 years old and above as it requires medium fine motor muscles and pattern mastery.
Happy weaving!
Merry Christmas

May you and your family cherish the wonderful memories of love, care & hope… May your family lives in joy and peace… Merry Christmas & Happy Holiday…
Thinking Out of The Toy Factory’s Instruction
In holiday time, children stay at home all day long. It’s nice having them around. However, we sometimes hear our children whining and say,”I’m bored!” When we hear it, we may think how come they are bored with all the toys they have. Then we say to them to play with their toys but they refuse to do so and keep whining. And this starts to annoy us but we don’t know what to do.

To solve the problem, we need to think why our children don’t want to play their toys. When they are like this, they actually run out of ideas of what to do with their toys. They need new idea to play the toys they have. If this happens, what should we do? It’s easy! Just create new games with the toys they have.
For example, they have playdough and they have played it based on the instruction given by the factory. This is the time when they will be bored. Therefore, show them new ideas of making things with the playdough such as using cookie cutters to make new shapes/things which are different with the one provided in the playdough toy, creating animals, fruit and so much more. And this will make them be excited to play the playdough again.
It’s simple, isn’t it? So next time our children say that they are bored, don’t worry. Here what we can do:
- Just be creative!
Think of more ideas than the original ones shown in the toys instructions. If we can’t think of ideas, just browse them online.
- Show our children the new ideas and play with them for a while.
When we do this, they definitely will follow us. Later on, they will have their own ideas. Once they have those, they won’t let us to play. They will just ask us to watch them and see their creation. When they do this, we can just enjoy and relax.
- Praise our children for the creation they have made.
This is an important part because our appraisal will make them want to create more. With many ideas in their mind they need to create, they won’t be bored at all
There you go! By thinking out of the toy factory’s instruction, children will be stimulated to be creative, so they won’t feel bored at all. And this will give us time to do our own activities or just relax watching our children play and grow by it.
Tearing Paper Activity Stage 1
In previous post, it is written that children tear paper in different ways. If we order them, the differences will show the stages of tearing paper. In stage one, children will tear paper by grabbing the paper with both hands on the right and left sides of the paper. This way actually shows that children’s fingers muscles aren’t strong enough to tear paper.
Considering this, if children are still in stage one, it’s better if we give soft paper or thin paper, so children will tear the paper easily.
After we prepare the suitable paper, just let them tear the paper. However, though tearing paper is fun, especially if it’s the first time our children do it, the excitement will fade out soon. Therefore, we have to make it more exciting by combining it with another activity.
Below is some tearing paper activities suitable for children who are on the first stage of tearing paper:
1. Tearing paper to make paper pulp
We don’t want the torn paper to be wasted, do we? So let children to throw the torn paper onto the bowl of water.

Then let them squeze the paper inside the bowl until it changes into pulp.
Combination of both activities will make them excited as most children love playing water whenever they’ve given the chance to do it. After that use the pulp to make many creation such as recycled paper or paper pulp craft.


Recycled Paper
2. Paste the torn paper
We can find many kid’s craft related with tearing paper. If our children are on the first stage of tearing paper, choose the simple tearing paper activity. Look at the examples below!


Those are the tearing paper activities in stage one where children have to tear the paper and then do another activity using the torn paper such as squeezing or pasting them.
Related Post:
3 Stages of Tearing Paper
Tearing paper is a fun and simple activity for young children. It’s also good to exercise children’s fine motor muscles. Therefore, it’s great if we occasionaly let children do the activity.
But do you know that, if you pay attention to children’s fingers while they tear paper, they will tear the paper in different kind of ways. Here are the ways you may see:
- Tear by grabbing the paper with both hands on the left and right sides of the paper.

- Tear by holding the paper with fingers of both hands on the left and right sides of the paper.

- Tear by holding the paper with thumb and forefinger of each hands on the left and right sides of the paper.


And do you know that the differences in tearing the paper actually show the strength of children’s fine motor muscles in stages. Here are how each ways show the strength:
- The first way mentioned above means that the child’s fingers muscles are not strong enough to tear the paper. That’s why he needs to grab the paper to tear it.
- The second way means that the fingers’ muscles has been stronger than the first one to tear the paper.
- The third way means that the child’s fingers has been strong and ready to tear paper in anyway she needs to.
Knowing the stages of tearing paper is important because it will make us able to
- Prepare the paper which is suitable with children’s strength to be torn. For example, give the soft or thin paper when children are in the first stage. By doing so, they will be able to tear the paper easily which will make them feel fun and happy doing it. And this will make them want to do it more than once. As they often doing so, their muscles will be strengthen. Then, we can gradually give the harder and thicker paper. This eventually will make them reach the second and the third stages.
- Recognize children’s fine motor muscles strength. The recognition will make us able to figure out the kind of activities which is suitable and proper based on children’s ability. So we won’t give the activities which may still too difficult to do by our children.
That’s all about tearing paper activity. It’s not only fun for children but it can also show us how far our children’s fine motor muscles have developed. And this can be our basis to think of other activities which will develop our children’s ability even more.
Related Post:
Finger Painting Activity in Steps
There are many kinds of finger painting activity children can do. Here, we want to show the kinds of finger painting activity in steps. Starting from finger painting activity which will help children develop and improve their gross motor skills to fine motor skills and eventually allow them to bring out their own creativity. Here are the activity in steps:
1. Let children to spread paint on wide space freely, as wide as their arms can reach. This activity is good to exercise and strengthen their gross motor muscle, in this case their arms.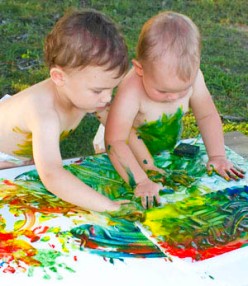
2. Let children to spread paint on narrower space than previous one. This activity will give them the chance to learn to control their arms movement and exercise their arms endurance, as it’s more difficult and more tiring to do.
3. Let children to paint pictures with fingers. Ask them to try not to cross the line. Starting from big picture to smaller one. This activity will give them chance to exercise fine motor muscles.
4. Let children to do many kinds of finger painting activity. This will give them the chance to exercise gross and fine motor muscles more and also give them ideas which will stimulate their creativity.


5. Let children create their own creation by finger painting.
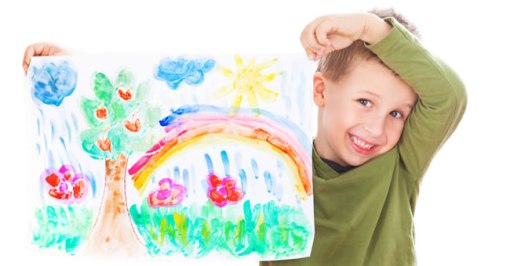
Those are the steps in finger painting activity. It doesn’t mean that from the first up to the fourth steps children can’t make their own creation. The fifth steps can be done simultaneously with all the steps. However, we put it here on the fifth steps, as it would be the final outcome if children have gone through all the steps. It’s because they would have all the technique to do the finger painting, have enough experience and knowledge to make their own creation. All of those will make them stimulated and keen to make their own creation.
Five Reasons Why Finger Painting is Important for Children
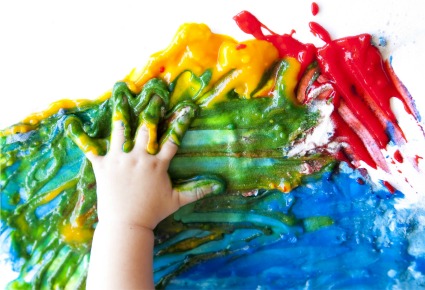
Finger painting is messy. It takes time to clean up the mess. So, we sometimes try to find way to make it less messy. However, it’s actually necessary for children to do the messy finger painting. Why? Here are the reasons:
- Children’s sense of curiosity will be fulfilled
Children always want to try everything. It includes the messy finger painting. It makes them curious. When we allow them to do what they want, their senses of curiosity will be fulfilled.
- Making a mess is the step they’ve got to go through
Not allowing children to make a mess will only make children skip the process they should’ve gone through in the first place. It will be like something is missing and their curiosity will stay inside them. Next time, they’ve got a chance to make a mess, they will do it. If this happens in public places, they may make a mess which may be disliked by others. This likely happens as they haven’t got the experience to control the mess they make -which they will be able to learn – if they’ve got the chance to make a mess in personal place such as home.
- Children will able to exercise their gross motor muscle
When they move their arms freely -which make the activity messier- they actually exercise gross motor muscles. As they do the activity often, their arms will be stronger which will make them able to control their arms movement better. And this actually will make them do the activity less messy next time. They will be able to make the paint spreading only at the space provided for the painting without crossing it. It’s due to their ability in controlling their arms. And this ability is important for later learning such as in writing letters and numbers.
- Children will able to exercise their fine motor muscle
The next step after their gross motor muscle developed is fine motor muscle. Finger painting will give them the experience to exercise fine motor muscle as well, especially the activity which requires fingers movement more than arms. And the exercised fine motor muscles is important for later learning such as writing letters and numbers, just as the exercised gross motor muscles.
- It’s a way to learn responsibility
Finger painting is messy. But by doing so, children actually can learn how to clean up the mess. If we show them how to do it, they would definitely follow what we do. So, if we let children do the activity regularly, they will learn that they have to clean up after they do the messy activity. And when they’ve learned about it, they actually have learned about the value of responsibility.
So, let children do the messy finger painting. By doing so, they will actually learn to do the activity less messy as they’ve gone through the process they’ve got to experience. Starting from really messy to neat and tidy. And along the process, they also learn about responsibility by cleaning up the mess they’ve made.
Happy finger painting with your children 🙂
What Would 2 Years Old Like to Do
At the age of 2, there are activities children like to do more than in previous age. It is so because their physical development have allowed them to do the activities. Here are the activities :
- Motor gross activities such running, climbing, reaching things make them curious, etc


They like to move freely because at this age, they have been able to walk steadily. This give them the sense of independence. Now, they can explore things they are curious about by themselves which they cant do before due to physical limitation.
- Exploring things they think interesting such as colorful & moving things


In the early years of life, a child is in sight sensitive period. It means, they will be interested to things which attract their eyes. As they’ve gained physical independence, they will expand their sight attractiveness by touching or exploring closely the things they see.
- Doing messy things such as painting, mixing flour, playing sand, etc.


They will do experiment with those materials with heir hands. Those activities will be messy because basically, they haven’t been able to control their hands completely. It’s also because they do experiment with their hands. They want to see the outcome of their hands movement.
- Imitating what adults do, especially words.

Children in the early years of life are in the stage of language sensitive period and in the imitating stage. Therefore, they are able to absorb the language they heard easily.
- Saying no often

They love saying no because they want independence to move freely. Therefore, they will say no, if we try to forbid them or when they think we block their way.
Those are the activities 2 years old children like most. It doesn’t mean that those activities are not done in previous age or later on. However, at the age of 2, those activities are delighting for them because they start able to explore those activities more independently than before (less help from adult). And this new sense of independence is actually what makes them like those.
Knowing what 2 years old children like will make us easy in preparing or setting activities our children can do in everyday’s life. By giving the activities they like and need, we actually have given them the opportunity or chance for them to develop their sense of independent which is very important for children’s development in the future.
Check out the activities 2 years old children can do in the next posting 🙂
